Sentinel 是阿里中间件团队研发的面向分布式服务架构的轻量级高可用流量控制组件,主要以流量为切入点,从流量控制、熔断降级、系统负载保护等多个维度来帮助用户保护服务的稳定性。
从一次 HTTP 请求开始
在一个生产环境中,服务节点通常暴露了成百上千个 HTTP 接口对外提供服务。为了保证系统的稳定性,核心 HTTP 接口往往需要配置限流规则。给 HTTP 接口配置限流,可以防止突发或恶意的高并发请求耗尽服务器资源(如 CPU、内存、数据库连接等),从而避免服务崩溃或引发雪崩效应。
基础示例
假设我们有下面这样一个 HTTP 接口,需要给它配置限流规则:
@RestController
@RequiredArgsConstructor
@RequestMapping("/demo")
public class DemoController {
	@RequestMapping("/hello")
	@SentinelResource("test_sentinel")
	public String hello() {
		return "hello world";
	}
}
使用起来非常简单。首先我们可以选择给接口加上 @SentinelResource 注解(也可以不加,如果不加 Sentinel 客户端会使用请求路径作为资源名,详细原理在后面章节讲解),然后到流控控制台给该资源配置流控规则即可。
限流规则的加载
限流规则的生效,是从限流规则的加载开始的。聚焦到客户端的 RuleLoader 类,可以看到它支持了多种规则的加载:
- 流控规则;
- 集群限流规则;
- 熔断规则;
- ......
RuleLoader 核心逻辑
RuleLoader 类的核心作用是将这些规则加载到缓存中,方便后续使用:
public class RuleLoader {
	/**
	* 加载所有 Sentinel 规则到内存缓存
	  *
	  * @param sentinelRules 包含各种规则的配置对象
	  */
	  public static void loadRule(SentinelRules sentinelRules) {
		  if (sentinelRules == null) {
			  return;
		  }
		  // 加载流控规则
		  FlowRuleManager.loadRules(sentinelRules.getFlowRules());
		  // 加载集群流控规则
		  RuleManager.loadClusterFlowRule(sentinelRules.getFlowRules());
		  // 加载参数流控规则
		  ParamFlowRuleManager.loadRules(sentinelRules.getParamFlowRules());
		  // 加载参数集群流控规则
		  RuleManager.loadClusterParamFlowRule(sentinelRules.getParamFlowRules());
		  // 加载熔断规则
		  DegradeRuleManager.loadRules(sentinelRules.getDegradeRules());
		  // 加载参数熔断规则
		  ParamDegradeRuleManager.loadRules(sentinelRules.getParamDegradeRules());
		  // 加载系统限流规则
		  SystemRuleManager.loadRules(sentinelRules.getSystemRules());
	  }
}
流控规则加载详情
以流控规则的加载为例深入FlowRuleManager.loadRules 方法可以看到其完整的加载逻辑:
public static void loadRules(List<FlowRule> rules) {
	// 通过动态配置属性更新规则值
	currentProperty.updateValue(rules);
}
updateValue 方法负责通知所有监听器配置变更:
public boolean updateValue(T newValue) {
	// 如果新旧值相同,无需更新
	if (isEqual(value, newValue)) {
		return false;
	}
	 RecordLog.info("[DynamicSentinelProperty] Config will be updated to: " + newValue);
	 // 更新配置值
	 value = newValue;
	 // 通知所有监听器配置已更新
	 for (PropertyListener<T> listener : listeners) {
		 listener.configUpdate(newValue);
	 }
	 return true;
}
FlowPropertyListener 是流控规则变更的具体监听器实现:
private static final class FlowPropertyListener implements PropertyListener<List<FlowRule>> {
	@Override
	public void configUpdate(List<FlowRule> value) {
		// 构建流控规则映射表(按资源名分组)
		Map<String, List<FlowRule>> rules = FlowRuleUtil.buildFlowRuleMap(value);
		if (rules != null) {
			// 清空旧规则
			flowRules.clear();
			// 加载新规则
			flowRules.putAll(rules);
		}
		RecordLog.info("[FlowRuleManager] Flow rules received: " + flowRules);
	}
}
SentinelServletFilter 过滤器
在 Sentinel 中,所有的资源都对应一个资源名称和一个 Entry。Entry 可以通过对主流框架的适配自动创建,也可以通过注解的方式或调用 API 显式创建。Entry 是限流的入口类,通过 @SentinelResource 注解的限流本质上也是通过 AOP 的方式进行了对 Entry 类的调用。
Entry 的编程范式
Entry 类的标准使用方式如下:
// 资源名可使用任意有业务语义的字符串,比如方法名、接口名或其它可唯一标识的字符串
try (Entry entry = SphU.entry("resourceName")) {
	// 被保护的业务逻辑
	// do something here...
}
catch (BlockException ex) {
	// 资源访问阻止,被限流或被降级
	// 在此处进行相应的处理操作
}
Servlet Filter 拦截逻辑
对于一个 HTTP 资源,在没有显式标注 @SentinelResource 注解的情况下,会有一个 Servlet Filter 类 SentinelServletFilter 统一进行拦截:
public class SentinelServletFilter implements Filter {
	@Override
	public void doFilter(ServletRequest request, ServletResponse response, FilterChain chain) throws IOException, ServletException {
		HttpServletRequest sRequest = (HttpServletRequest) request;
		Entry urlEntry = null;
		try {
			// 获取并清理请求路径
			String target = FilterUtil.filterTarget(sRequest);
			// 统一 URL 清理逻辑
			// 对于 RESTful API,必须对 URL 进行清理(例如将 /foo/1 和 /foo/2 统一为 /foo/:id),
			// 否则上下文和资源的数量会超过阈值
			SentinelUrlCleaner urlCleaner = SentinelUrlCleaner.SENTINEL_URL_CLEANER;
			if (urlCleaner != null) {
				target = urlCleaner.clean(sRequest, target);
			}
			// 如果请求路径不为空且非安全扫描,则进入限流逻辑
			if (!StringUtil.isEmpty(target) && !isSecScan) {
				// 解析来源标识(用于来源限流)
				String origin = parseOrigin(sRequest);
				// 确定上下文名称
				String contextName = webContextUnify                    ? WebServletConfig.WEB_SERVLET_CONTEXT_NAME                    : target;
				// 使用 WEB_SERVLET_CONTEXT_NAME 作为当前 Context 的名字
				ContextUtil.enter(contextName, origin);
				// 根据配置决定是否包含 HTTP 方法
				if (httpMethodSpecify) {
					String pathWithHttpMethod = sRequest.getMethod().toUpperCase() + COLON + target;
					// 实际进入到限流统计判断逻辑,资源名是 "方法:路径"
					urlEntry = SphU.entry(pathWithHttpMethod, ResourceTypeConstants.COMMON_WEB, EntryType.IN);
				} else {
					// 实际进入到限流统计判断逻辑,资源名是请求路径
					urlEntry = SphU.entry(target, ResourceTypeConstants.COMMON_WEB, EntryType.IN);
				}
			}
			// 继续执行后续过滤器
			chain.doFilter(request, response);
		 catch (BlockException e) {
			 // 处理被限流的情况
			 HttpServletResponse sResponse = (HttpServletResponse) response;
			 // 返回限流页面或重定向到其他 URL
			 WebCallbackManager.getUrlBlockHandler().blocked(sRequest, sResponse, e);
		 } catch (IOException | ServletException | RuntimeException e2) {
			 // 记录异常信息用于统计
			 Tracer.traceEntry(e2, urlEntry);
			 throw e2;
		 } finally {
			 // 释放 Entry 资源
			 if (urlEntry != null) {
			 urlEntry.exit();
		 }
		 // 退出当前上下文
		 ContextUtil.exit();
		 }
	 }
 }
SentinelResourceAspect 切面
如果在接口上标注了 @SentinelResource 注解,还会有另外的逻辑处理。Sentinel 定义了一个单独的 AOP 切面 SentinelResourceAspect 专门用于处理注解限流。
SentinelResource 注解定义
先来看看 @SentinelResource 注解的完整定义:
@Target({ElementType.METHOD, ElementType.TYPE})
@Retention(RetentionPolicy.RUNTIME)
@Inheritedpublic
@interface SentinelResource {
	/**
	* Sentinel 资源的名称(即资源标识)
	* 必填项,不能为空
	*/
	String value() default "";
	/**
	* 资源的入口类型(入站 IN 或出站 OUT)
	* 默认为出站(OUT)
	*/
	EntryType entryType() default EntryType.OUT;
	/**
	* 资源的分类(类型)
	* 自 1.7.0 版本起支持
	*/
	int resourceType() default 0;
	/**
	* 限流或熔断时调用的 block 异常处理方法的名称
	* 默认为空(即不指定)
	*/
	String blockHandler() default "";
	/**
	* blockHandler 所在的类
	* 如果与原方法不在同一个类,需要指定此参数
	*/
	Class<?>[] blockHandlerClass() default {};
	/**
	* 降级(fallback)方法的名称
	* 默认为空(即不指定)
	*/
	String fallback() default "";
	/**
	* 用作通用的默认降级方法
	* 该方法不能接收任何参数,且返回类型需与原方法兼容
	*/
	String defaultFallback() default "";
	/**
	* fallback 所在的类
	* 如果与原方法不在同一个类,需要指定此参数
	*/
	Class<?>[] fallbackClass() default {};
	/**
	* 需要被追踪并触发 fallback 的异常类型列表
	* 默认为 Throwable(即所有异常都会触发 fallback)
	*/
	Class<? extends Throwable>[] exceptionsToTrace() default {Throwable.class};
	/**
	* 指定需要忽略的异常类型(即这些异常不会触发 fallback)
	* 注意:exceptionsToTrace 和 exceptionsToIgnore 不应同时使用;
	* 若同时存在,exceptionsToIgnore 优先级更高
	*/
	Class<? extends Throwable>[] exceptionsToIgnore() default {};
}
实际使用示例
下面是一个完整的使用示例,展示了 @SentinelResource 注解的各种配置方式:
@RestController
public class SentinelController {

    @Autowired
    private ISentinelService service;

    @GetMapping(value = "/hello/{s}")
    public String apiHello(@PathVariable long s) {
        return service.hello(s);
    }
}

public interface ISentinelService {
    String hello(long s);
}

@Service
@Slf4j
public class SentinelServiceImpl implements ISentinelService {

    /**
     * Sentinel 提供了 @SentinelResource 注解用于定义资源
     *
     * @param s 输入参数
     * @return 返回结果
     */
    @Override
    // value:资源名称,必需项(不能为空)
    // blockHandler:对应处理 BlockException 的函数名称
    // fallback:用于在抛出异常的时候提供 fallback 处理逻辑
    @SentinelResource(value = "hello", blockHandler = "exceptionHandler", fallback = "helloFallback")
    public String hello(long s) {
        log.error("hello:{}", s);
        return String.format("Hello at %d", s);
    }

    /**
     * Fallback 函数
     * 函数签名与原函数一致,或加一个 Throwable 类型的参数
     */
    public String helloFallback(long s) {
        log.error("helloFallback:{}", s);
        return String.format("Halooooo %d", s);
    }

    /**
     * Block 异常处理函数
     * 参数最后多一个 BlockException,其余与原函数一致
     */
    public String exceptionHandler(long s, BlockException ex) {
        // Do some log here.
        log.error("exceptionHandler:{}", s);
        ex.printStackTrace();
        return "Oops, error occurred at " + s;
    }
}
SentinelResourceAspect 核心逻辑
@SentinelResource 注解由 SentinelResourceAspect 切面处理,核心逻辑如下:
@Aspect
public class SentinelResourceAspect extends AbstractSentinelAspectSupport {

    @Pointcut("@annotation(com.alibaba.csp.sentinel.annotation.SentinelResource)")
    public void sentinelResourceAnnotationPointcut() {
    }

    @Around("sentinelResourceAnnotationPointcut()")
    public Object invokeResourceWithSentinel(ProceedingJoinPoint pjp) throws Throwable {
        // 获取目标方法
        Method originMethod = resolveMethod(pjp);

        // 获取注解信息
        SentinelResource annotation = originMethod.getAnnotation(SentinelResource.class);
        if (annotation == null) {
            throw new IllegalStateException("Wrong state for SentinelResource annotation");
        }

        // 获取资源配置信息
        String resourceName = getResourceName(annotation.value(), originMethod);
        EntryType entryType = annotation.entryType();
        int resourceType = annotation.resourceType();

        Entry entry = null;
        try {
            // 创建限流入口
            entry = SphU.entry(resourceName, resourceType, entryType, pjp.getArgs());
            // 执行原方法
            Object result = pjp.proceed();
            return result;

        } catch (BlockException ex) {
            // 处理被限流异常
            return handleBlockException(pjp, annotation, ex);

        } catch (Throwable ex) {
            // 处理业务异常
            Class<? extends Throwable>[] exceptionsToIgnore = annotation.exceptionsToIgnore();
            // 优先检查忽略列表
            if (exceptionsToIgnore.length > 0 && exceptionBelongsTo(ex, exceptionsToIgnore)) {
                throw ex;
            }
            // 检查异常是否在追踪列表中
            if (exceptionBelongsTo(ex, annotation.exceptionsToTrace())) {
                traceException(ex);
                // 执行 fallback 逻辑
                return handleFallback(pjp, annotation, ex);
            }

            // 没有 fallback 函数可以处理该异常,直接抛出
            throw ex;

        } finally {
            // 释放 Entry 资源
            if (entry != null) {
                entry.exit(1, pjp.getArgs());
            }
        }
    }

    /**
     * 处理 BlockException
     *
     * blockHandler / blockHandlerClass 说明:
     * - blockHandler:对应处理 BlockException 的函数名称,可选项
     * - blockHandler 函数签名:与原方法相匹配并且最后加一个额外的参数,类型为 BlockException
     * - blockHandler 函数默认需要和原方法在同一个类中
     * - 若希望使用其他类的函数,则可以指定 blockHandlerClass 为对应的类的 Class 对象
     * - 注意:blockHandlerClass 中对应的函数必须为 static 函数,否则无法解析
     */
    protected Object handleBlockException(ProceedingJoinPoint pjp, SentinelResource annotation, BlockException ex)
            throws Throwable {

        // 执行 blockHandler 方法(如果配置了的话)
        Method blockHandlerMethod = extractBlockHandlerMethod(pjp, annotation.blockHandler(),
                annotation.blockHandlerClass());

        if (blockHandlerMethod != null) {
            Object[] originArgs = pjp.getArgs();
            // 构造参数:原方法参数 + BlockException
            Object[] args = Arrays.copyOf(originArgs, originArgs.length + 1);
            args[args.length - 1] = ex;

            try {
                // 根据 static 方法与否进行不同的调用
                if (isStatic(blockHandlerMethod)) {
                    return blockHandlerMethod.invoke(null, args);
                }
                return blockHandlerMethod.invoke(pjp.getTarget(), args);
            } catch (InvocationTargetException e) {
                // 抛出实际的异常
                throw e.getTargetException();
            }
        }

        // 如果没有 blockHandler,则尝试执行 fallback
        return handleFallback(pjp, annotation, ex);
    }

    /**
     * 处理 Fallback 逻辑
     *
     * fallback / fallbackClass 说明:
     * - fallback:fallback 函数名称,可选项,用于在抛出异常的时候提供 fallback 处理逻辑
     * - fallback 函数可以针对所有类型的异常(除了 exceptionsToIgnore 里面排除掉的异常类型)进行处理
     *
     * fallback 函数签名和位置要求:
     * - 返回值类型必须与原函数返回值类型一致
     * - 方法参数列表需要和原函数一致,或者可以额外多一个 Throwable 类型的参数用于接收对应的异常
     * - fallback 函数默认需要和原方法在同一个类中
     * - 若希望使用其他类的函数,则可以指定 fallbackClass 为对应的类的 Class 对象
     * - 注意:fallbackClass 中对应的函数必须为 static 函数,否则无法解析
     */
    protected Object handleFallback(ProceedingJoinPoint pjp, String fallback, String defaultFallback,
                                    Class<?>[] fallbackClass, Throwable ex) throws Throwable {
        Object[] originArgs = pjp.getArgs();

        // 执行 fallback 函数(如果配置了的话)
        Method fallbackMethod = extractFallbackMethod(pjp, fallback, fallbackClass);

        if (fallbackMethod != null) {
            // 构造参数:根据 fallback 方法的参数数量决定是否添加异常参数
            int paramCount = fallbackMethod.getParameterTypes().length;
            Object[] args;
            if (paramCount == originArgs.length) {
                args = originArgs;
            } else {
                args = Arrays.copyOf(originArgs, originArgs.length + 1);
                args[args.length - 1] = ex;
            }

            try {
                // 根据 static 方法与否进行不同的调用
                if (isStatic(fallbackMethod)) {
                    return fallbackMethod.invoke(null, args);
                }
                return fallbackMethod.invoke(pjp.getTarget(), args);
            } catch (InvocationTargetException e) {
                // 抛出实际的异常
                throw e.getTargetException();
            }
        }

        // 如果没有 fallback,尝试使用 defaultFallback
        return handleDefaultFallback(pjp, defaultFallback, fallbackClass, ex);
    }
}
流控处理核心逻辑
从入口函数开始,我们深入到流控处理的核心逻辑。
入口函数调用链
public class SphU {

    /**
     * 创建限流入口
     *
     * @param name 资源名称
     * @param resourceType 资源类型
     * @param trafficType 流量类型(IN 或 OUT)
     * @param args 参数数组
     * @return Entry 对象
     * @throws BlockException 如果被限流则抛出此异常
     */
    public static Entry entry(String name, int resourceType, EntryType trafficType, Object[] args)
            throws BlockException {
        return Env.sph.entryWithType(name, resourceType, trafficType, 1, args);
    }

    public static Entry entry(String name, EntryType trafficType, int batchCount) throws BlockException {
        return Env.sph.entry(name, trafficType, batchCount, OBJECTS0);
    }
}
public class CtSph implements Sph {
@Override
public Entry entry(String name, EntryType type, int count, Object... args) throws BlockException {
StringResourceWrapper resource = new StringResourceWrapper(name, type);
return entry(resource, count, args);
}
public Entry entry(ResourceWrapper resourceWrapper, int count, Object... args) throws BlockException {
return entryWithPriority(resourceWrapper, count, false, args);
}
/**
* 带优先级的入口方法,这是限流的核心逻辑
*/
private Entry entryWithPriority(ResourceWrapper resourceWrapper, int count, boolean prioritized, Object... args)
throws BlockException {
Context context = ContextUtil.getContext();
// 如果上下文数量超过阈值,则不进行规则检查
if (context instanceof NullContext) {
// NullContext 表示上下文数量超过了阈值,这里只初始化 Entry,不进行规则检查
return new CtEntry(resourceWrapper, null, context);
}
// 如果没有上下文,使用默认上下文
if (context == null) {
context = InternalContextUtil.internalEnter(Constants.CONTEXT_DEFAULT_NAME);
}
// 如果全局开关关闭,则不进行规则检查
if (!Constants.ON) {
return new CtEntry(resourceWrapper, null, context);
}
// 获取或创建 ProcessorSlotChain(责任链)
ProcessorSlot<Object> chain = lookProcessChain(resourceWrapper);
/*
* 如果资源(slot chain)数量超过 {@link Constants.MAX_SLOT_CHAIN_SIZE},
* 则不进行规则检查
*/
if (chain == null) {
return new CtEntry(resourceWrapper, null, context);
}
// 创建 Entry 对象
Entry e = new CtEntry(resourceWrapper, chain, context);
try {
// 执行责任链进行规则检查
chain.entry(context, resourceWrapper, null, count, prioritized, args);
} catch (BlockException e1) {
// 如果被限流,释放 Entry 并抛出异常
e.exit(count, args);
throw e1;
} catch (Throwable e1) {
// 这不应该发生,除非 Sentinel 内部存在错误
log.warn("Sentinel unexpected exception,{}", e1.getMessage());
}
return e;
}
}ProcessorSlotChain 功能插槽链
lookProcessChain 方法实际创建了 ProcessorSlotChain 功能插槽链。ProcessorSlotChain 采用责任链模式,将不同的功能(限流、降级、系统保护)组合在一起。
SlotChain 的获取与创建
ProcessorSlot<Object> lookProcessChain(ResourceWrapper resourceWrapper) {
    // 先从缓存中获取
    ProcessorSlotChain chain = chainMap.get(resourceWrapper);

    if (chain == null) {
        // 双重检查锁,保证线程安全
        synchronized (LOCK) {
            chain = chainMap.get(resourceWrapper);
            if (chain == null) {
                // Entry 大小限制
                if (chainMap.size() >= Constants.MAX_SLOT_CHAIN_SIZE) {
                    return null;
                }

                // 创建新的 SlotChain
                chain = SlotChainProvider.newSlotChain();

                // 使用不可变模式更新缓存
                Map<ResourceWrapper, ProcessorSlotChain> newMap =
                    new HashMap<ResourceWrapper, ProcessorSlotChain>(chainMap.size() + 1);
                newMap.putAll(chainMap);
                newMap.put(resourceWrapper, chain);
                chainMap = newMap;
            }
        }
    }
    return chain;
}
SlotChain 的构建
public class DefaultSlotChainBuilder implements SlotChainBuilder {

    @Override
    public ProcessorSlotChain build() {
        ProcessorSlotChain chain = new DefaultProcessorSlotChain();

        // 通过 SPI 加载所有 ProcessorSlot 并排序
        List<ProcessorSlot> sortedSlotList = SpiLoader.loadPrototypeInstanceListSorted(ProcessorSlot.class);

        for (ProcessorSlot slot : sortedSlotList) {
            // 只处理继承自 AbstractLinkedProcessorSlot 的 Slot
            if (!(slot instanceof AbstractLinkedProcessorSlot)) {
                RecordLog.warn("The ProcessorSlot(" + slot.getClass().getCanonicalName() +
                    ") is not an instance of AbstractLinkedProcessorSlot, can't be added into ProcessorSlotChain");
                continue;
            }

            // 将 Slot 添加到责任链尾部
            chain.addLast((AbstractLinkedProcessorSlot<?>) slot);
        }

        return chain;
    }
}
SlotChain 的功能划分
Slot Chain 可以分为两部分:
- 统计数据构建部分(statistic):负责收集各种指标数据;
- 判断部分(rule checking):根据规则判断是否限流。
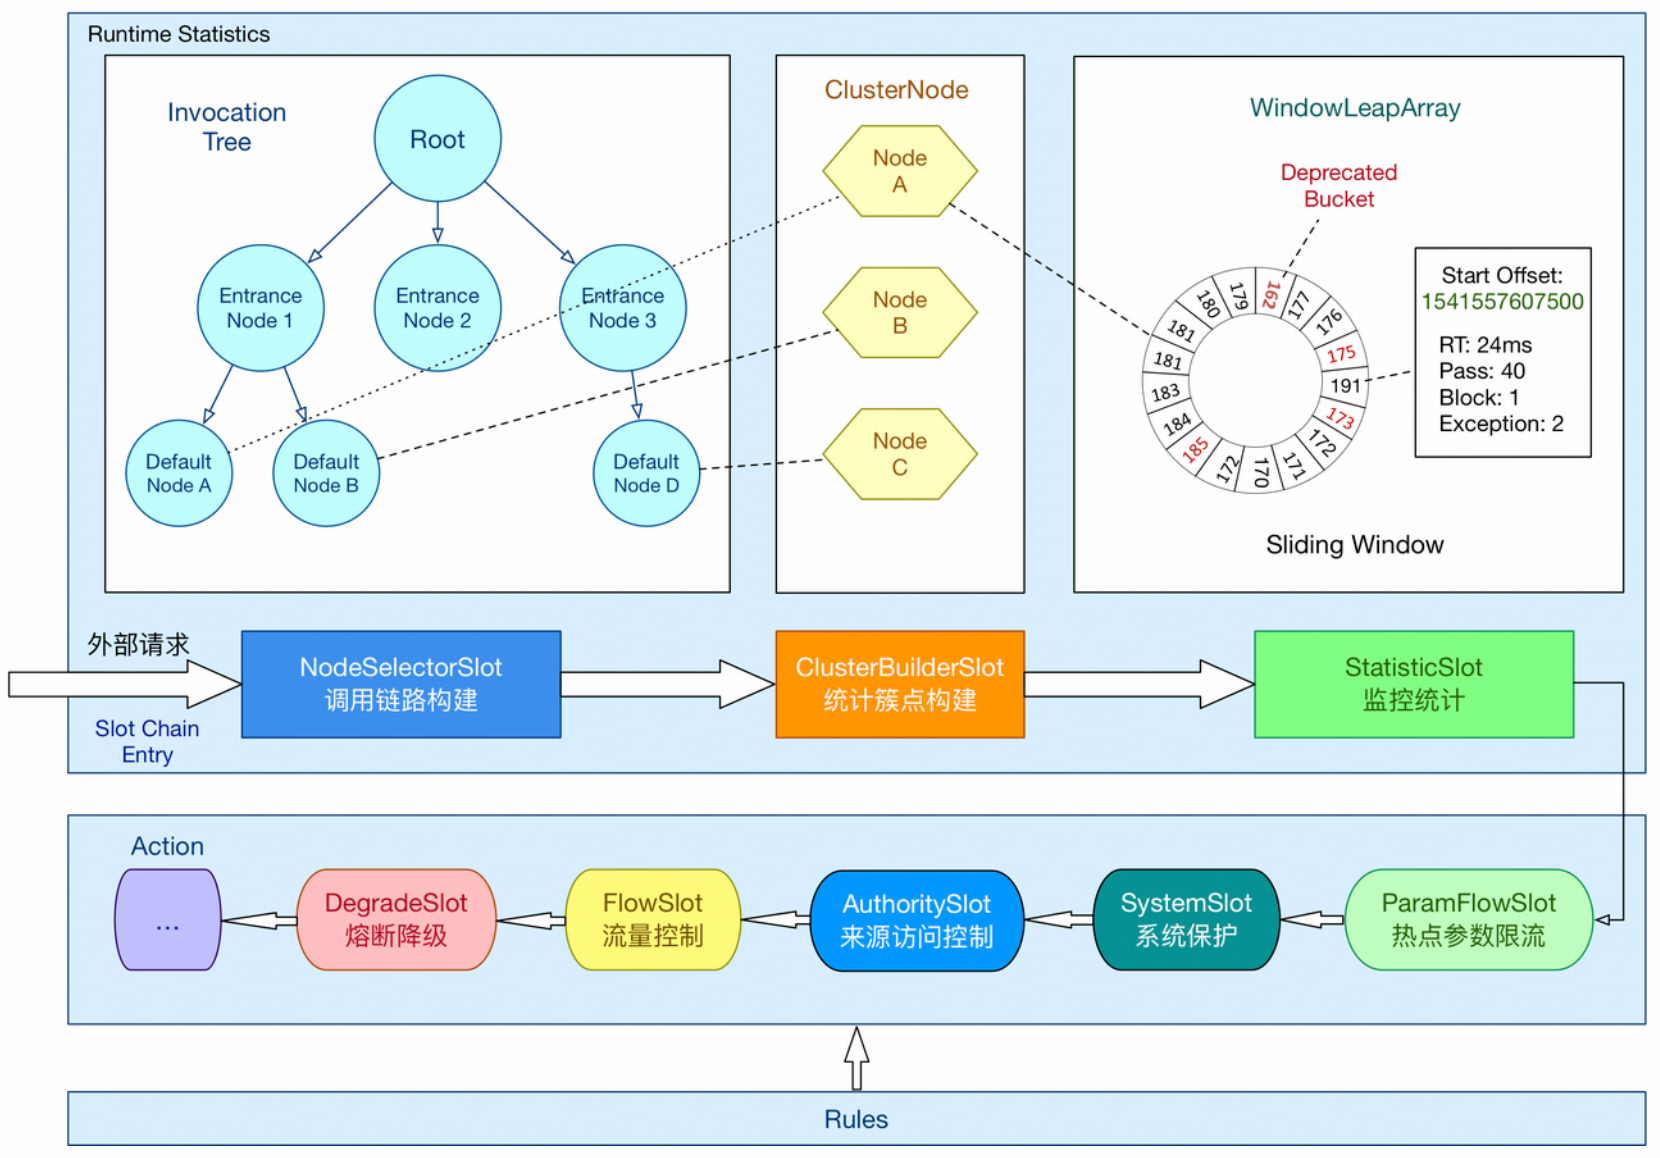
官方架构图很好地解释了各个 Slot 的作用及其负责的部分。目前 ProcessorSlotChain 的设计是一个资源对应一个,构建好后缓存起来,方便下次直接取用。
各 Slot 的执行顺序
以下是 Sentinel 中各个 Slot 的默认执行顺序:
NodeSelectorSlot
    ↓
ClusterBuilderSlot
    ↓
StatisticSlot
    ↓
ParamFlowSlot
    ↓
SystemSlot
    ↓
AuthoritySlot
    ↓
FlowSlot
    ↓
DegradeSlot
NodeSelectorSlot - 上下文节点选择
这个功能插槽主要为资源下不同的上下文创建对应的 DefaultNode(实际用于统计指标信息)。解释一下Sentinel中的Node是什么,简单来说就是每个资源统计指标存放的容器,只不过内部由于不同的统计口径(秒级、分钟及)而分别有不同的统计窗口。Node在Sentinel不是单一的结构,而是总体上形成父子关系的树形结构。
不同的调用会有不同的 context 名称,如在当前 MVC 场景下,上下文为 sentinel_web_servlet_context。
public class NodeSelectorSlot extends AbstractLinkedProcessorSlot<Object> {

    /**
     * 同一个资源在不同上下文中的 DefaultNode 映射
     */
    private volatile Map<String, DefaultNode> map = new HashMap<String, DefaultNode>(10);

    @Override
    public void entry(Context context, ResourceWrapper resourceWrapper, Object obj, int count,
                      boolean prioritized, Object... args) throws Throwable {
        // 从映射表中获取当前上下文对应的节点
        DefaultNode node = map.get(context.getName());

        if (node == null) {
            // 双重检查锁,保证线程安全
            synchronized (this) {
                node = map.get(context.getName());
                if (node == null) {
                    // 创建新的 DefaultNode
                    node = new DefaultNode(resourceWrapper, null);

                    // 使用写时复制更新缓存
                    HashMap<String, DefaultNode> cacheMap = new HashMap<String, DefaultNode>(map.size());
                    cacheMap.putAll(map);
                    cacheMap.put(context.getName(), node);
                    map = cacheMap;

                    // 构建调用树
                    ((DefaultNode) context.getLastNode()).addChild(node);
                }
            }
        }

        // 设置当前上下文的当前节点
        context.setCurNode(node);
        // 继续执行后续 Slot
        fireEntry(context, resourceWrapper, node, count, prioritized, args);
    }

    @Override
    public void exit(Context context, ResourceWrapper resourceWrapper, int count, Object... args) {
        fireExit(context, resourceWrapper, count, args);
    }
}
ClusterBuilderSlot - 集群节点构建
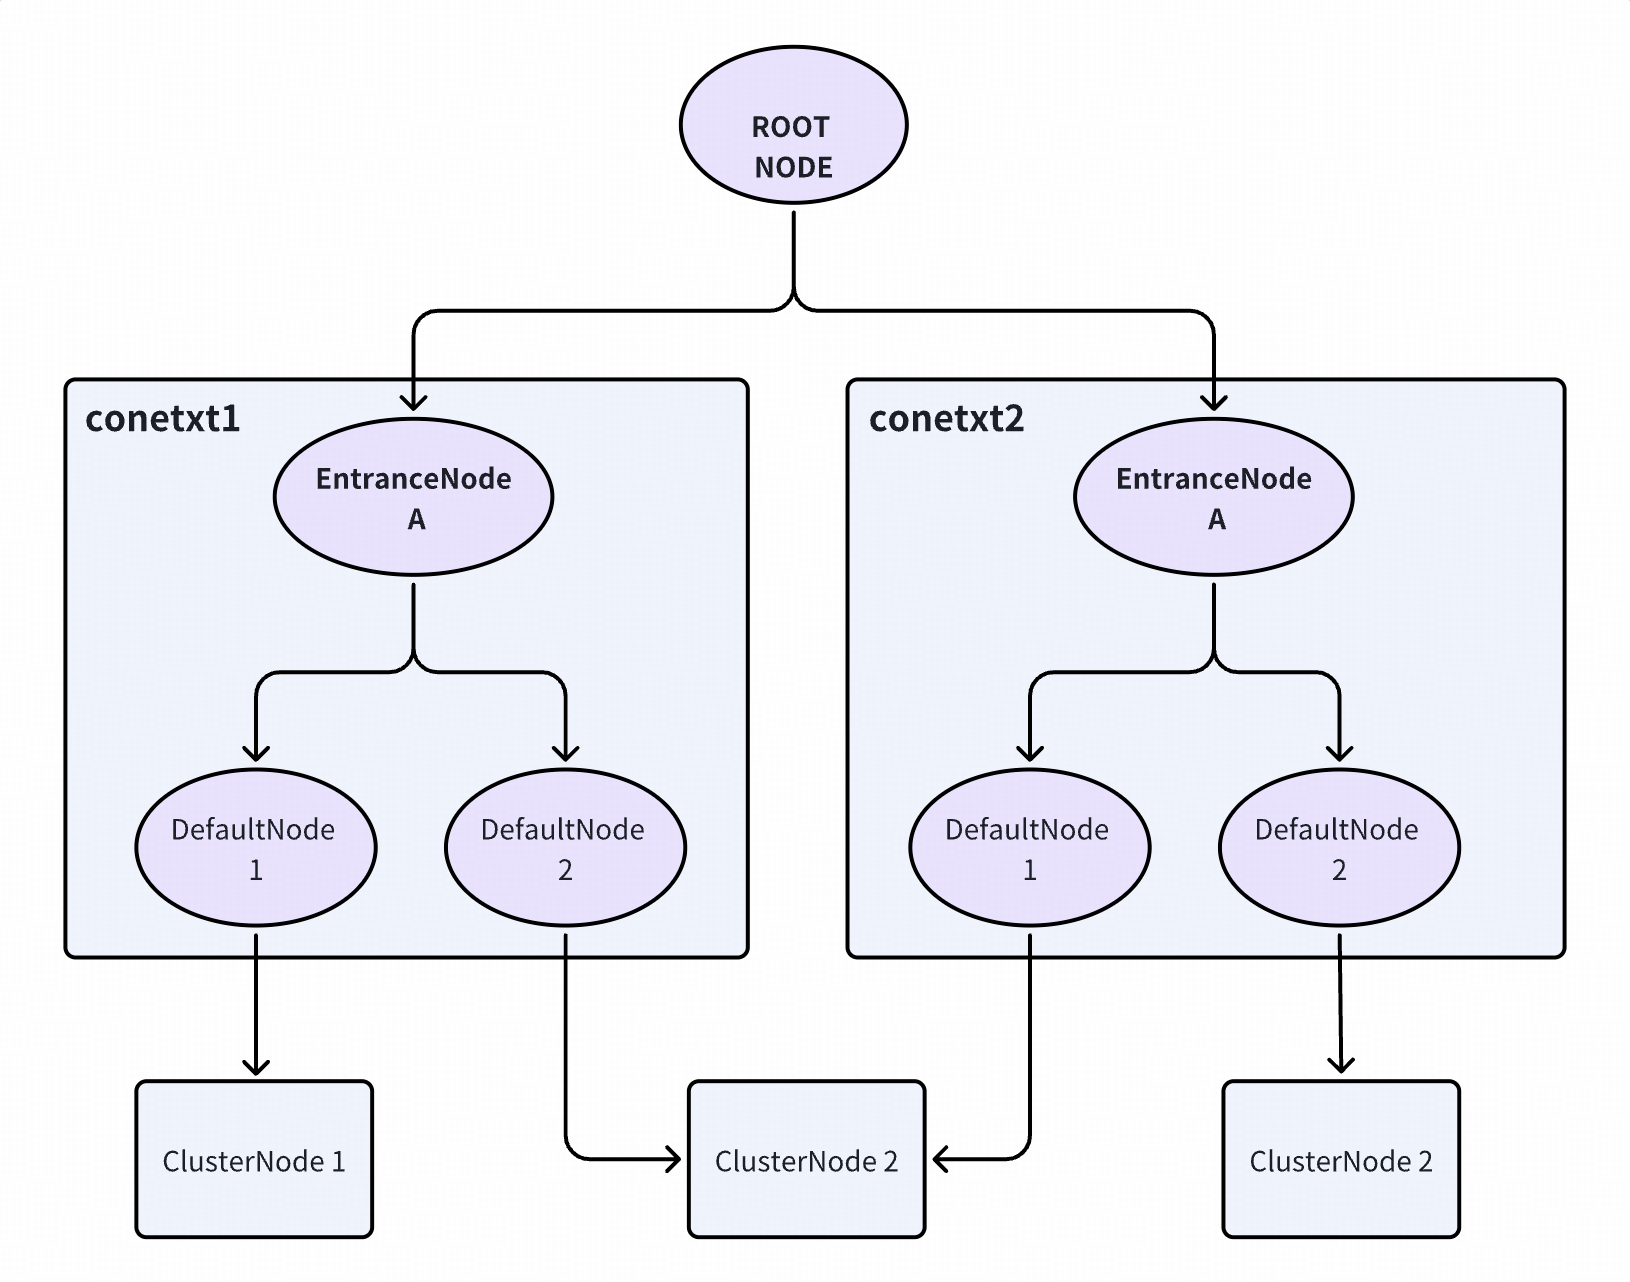
这个功能槽主要用于创建 ClusterNode。ClusterNode 和 DefaultNode 的区别是:
- DefaultNode 是特定于上下文的(context-specific);
- ClusterNode 是不区分上下文的(context-independent),用于统计该资源在所有上下文中的整体数据。
public class ClusterBuilderSlot extends AbstractLinkedProcessorSlot<DefaultNode> {

    /**
     * 全局 ClusterNode 映射表
     */
    private static volatile Map<ResourceWrapper, ClusterNode> clusterNodeMap = new HashMap<>();

    private static final Object lock = new Object();

    private volatile ClusterNode clusterNode = null;

    @Override
    public void entry(Context context, ResourceWrapper resourceWrapper, DefaultNode node, int count,
                      boolean prioritized, Object... args) throws Throwable {
        // 创建 ClusterNode(如果不存在)
        if (clusterNode == null) {
            synchronized (lock) {
                if (clusterNode == null) {
                    // 创建集群节点
                    clusterNode = new ClusterNode(resourceWrapper.getName(), resourceWrapper.getResourceType());

                    // 更新全局映射表
                    HashMap<ResourceWrapper, ClusterNode> newMap =
                        new HashMap<>(Math.max(clusterNodeMap.size(), 16));
                    newMap.putAll(clusterNodeMap);
                    newMap.put(node.getId(), clusterNode);

                    clusterNodeMap = newMap;
                }
            }
        }

        // 将 ClusterNode 设置到 DefaultNode 中
        node.setClusterNode(clusterNode);

        // 如果有来源标识,则创建 origin node
        if (!"".equals(context.getOrigin())) {
            Node originNode = node.getClusterNode().getOrCreateOriginNode(context.getOrigin());
            context.getCurEntry().setOriginNode(originNode);
        }

        // 继续执行后续 Slot
        fireEntry(context, resourceWrapper, node, count, prioritized, args);
    }
}
StatisticSlot - 统计插槽
StatisticSlot 是 Sentinel 最重要的类之一,用于根据规则判断结果进行相应的统计操作。
统计逻辑说明
entry 的时候:
- 依次执行后续的判断 Slot;
- 每个 Slot 触发流控会抛出异常(BlockException 的子类);
- 若有 BlockException 抛出,则记录 block 数据;
- 若无异常抛出则算作可通过(pass),记录 pass 数据。
exit 的时候:
- 若无 error(无论是业务异常还是流控异常),记录 complete(success)以及 RT,线程数 -1。
记录数据的维度:
- 线程数 +1;
- 记录当前 DefaultNode 数据;
- 记录对应的 originNode 数据(若存在 origin);
- 累计 IN 统计数据(若流量类型为 IN)。
public class StatisticSlot extends AbstractLinkedProcessorSlot<DefaultNode> {

    @Override
    public void entry(Context context, ResourceWrapper resourceWrapper, DefaultNode node, int count,
                      boolean prioritized, Object... args) throws Throwable {
        try {
            // 此位置会调用 SlotChain 中后续的所有 Slot,完成所有规则检测
            fireEntry(context, resourceWrapper, node, count, prioritized, args);

            // 请求通过,增加线程数和通过数
            // 代码运行到这个位置,就证明之前的所有 Slot 检测都通过了
            // 此时就可以统计请求的相应数据了

            // 增加线程数(+1)
            node.increaseThreadNum();
            // 增加通过请求的数量(这里涉及到滑动窗口算法)
            node.addPassRequest(count);

            // 省略其他统计逻辑...

        } catch (PriorityWaitException ex) {
            // 如果是优先级等待异常,记录优先级等待数
            node.increaseThreadNum();
            if (context.getCurEntry().getOriginNode() != null) {
                context.getCurEntry().getOriginNode().increaseThreadNum();
            }
            if (resourceWrapper.getEntryType() == EntryType.IN) {
                // 记录入站统计数据
                Constants.ENTRY_NODE.increaseThreadNum();
            }
            throw ex;

        } catch (BlockException e) {
            // 如果被限流,记录被限流数
            // 省略 block 统计逻辑...
            throw e;

        } catch (Throwable ex) {
            // 如果发生业务异常,记录异常数
            // 省略异常统计逻辑...
            throw ex;
        }
    }

    @Override
    public void exit(Context context, ResourceWrapper resourceWrapper, int count, Object... args) {
        // 若无 error(无论是业务异常还是流控异常),记录 complete(success)以及 RT,线程数-1
        // 记录数据的维度:线程数+1、记录当前 DefaultNode 数据、记录对应的 originNode 数据(若存在 origin)
        // 、累计 IN 统计数据(若流量类型为 IN)
        // 省略 exit 统计逻辑...
    }
}
StatisticNode 数据结构
到这里,StatisticSlot 的作用已经比较清晰了。接下来我们需要分析它的统计数据结构。fireEntry 调用向下的节点和之前的方式一样,剩下的节点主要包括:
- ParamFlowSlot;
- SystemSlot;
- AuthoritySlot;
- FlowSlot;
- DegradeSlot;
其中比较常见的是流控和熔断:FlowSlot、DegradeSlot,所以下面我们着重分析 FlowSlot。
FlowSlot - 流控插槽
这个 Slot 主要根据预设的资源的统计信息,按照固定的次序依次生效。如果一个资源对应两条或者多条流控规则,则会根据如下次序依次检验,直到全部通过或者有一个规则生效为止。
FlowSlot 核心逻辑
@SpiOrder(-2000)
public class FlowSlot extends AbstractLinkedProcessorSlot<DefaultNode> {

    @Override
    public void entry(Context context, ResourceWrapper resourceWrapper, DefaultNode node, int count,
                      boolean prioritized, Object... args) throws Throwable {
        // 执行流控检查
        checkFlow(resourceWrapper, context, node, count, prioritized);

        // 继续执行后续 Slot
        fireEntry(context, resourceWrapper, node, count, prioritized, args);
    }

    // 省略其他方法...
}
checkFlow 方法详解
/**
 * 执行流控检查
 *
 * @param ruleProvider 规则提供者函数
 * @param resource 资源包装器
 * @param context 上下文
 * @param node 节点
 * @param count 请求数量
 * @param prioritized 是否优先
 * @throws BlockException 如果被限流则抛出异常
 */
public void checkFlow(Function<String, Collection<FlowRule>> ruleProvider, ResourceWrapper resource,
                      Context context, DefaultNode node, int count, boolean prioritized) throws BlockException {
    // 判断规则和资源不能为空
    if (ruleProvider == null || resource == null) {
        return;
    }

    // 获取指定资源的所有流控规则
    Collection<FlowRule> rules = ruleProvider.apply(resource.getName());

    // 逐个应用流控规则。若无法通过则抛出异常,后续规则不再应用
    if (rules != null) {
        for (FlowRule rule : rules) {
            if (!canPassCheck(rule, context, node, count, prioritized)) {
                // FlowException 继承 BlockException
                throw new FlowException(rule.getLimitApp(), rule);
            }
        }
    }
}
通过这里我们就可以得知,流控规则是通过 FlowRule 来完成的,数据来源是我们使用的流控控制台,也可以通过代码进行设置。
FlowRule 流控规则
每条流控规则主要由三个要素构成:
- **grade(阈值类型):**按 QPS(每秒请求数)还是线程数进行限流;
- **strategy(调用关系策略):**基于调用关系的流控策略;
- **controlBehavior(流控效果):**当 QPS 超过阈值时的流量整形行为。
public class FlowRule extends AbstractRule {

    public FlowRule() {
        super();
        // 来源默认 Default
        setLimitApp(RuleConstant.LIMIT_APP_DEFAULT);
    }

    public FlowRule(String resourceName) {
        super();
        // 资源名称
        setResource(resourceName);
        setLimitApp(RuleConstant.LIMIT_APP_DEFAULT);
    }

    /**
     * 流控的阈值类型
     * 0: 线程数
     * 1: QPS
     */
    private int grade = RuleConstant.FLOW_GRADE_QPS;

    /**
     * 流控阈值
     */
    private double count;

    /**
     * 基于调用链的流控策略
     * STRATEGY_DIRECT: 直接流控(按来源)
     * STRATEGY_RELATE: 关联流控(关联资源)
     * STRATEGY_CHAIN: 链路流控(按入口资源)
     */
    private int strategy = RuleConstant.STRATEGY_DIRECT;

    /**
     * 关联流控模式下的关联资源
     */
    private String refResource;

    /**
     * 流控效果(流量整形行为)
     * 0: 默认(直接拒绝)
     * 1: 预热(Warm Up)
     * 2: 排队等待(Rate Limiter)
     * 3: 预热 + 排队等待(目前控制台没有)
     */
    private int controlBehavior = RuleConstant.CONTROL_BEHAVIOR_DEFAULT;

    /**
     * 预热时长(秒)
     */
    private int warmUpPeriodSec = 10;

    /**
     * 排队等待的最大超时时间(毫秒)
     */
    private int maxQueueingTimeMs = 500;

    /**
     * 是否为集群模式
     */
    private boolean clusterMode;

    /**
     * 集群模式配置
     */
    private ClusterFlowConfig clusterConfig;

    /**
     * 流量整形控制器
     */
    private TrafficShapingController controller;

    // 省略 getter/setter 方法...
}
滑动窗口算法
不管流控规则采用何种流控算法,在底层都需要有支持指标统计的数据结构作为支撑。在 Sentinel 中,用于支撑基于 QPS 等限流的数据结构是 StatisticNode。
StatisticNode 数据结构
public class StatisticNode implements Node {

    /**
     * 保存最近 1 秒内的统计数据
     * 每个桶(bucket)500ms,共 2 个桶
     */
    private transient volatile Metric rollingCounterInSecond =
        new ArrayMetric(SampleCountProperty.SAMPLE_COUNT, IntervalProperty.INTERVAL);

    /**
     * 保存最近 60 秒的统计数据
     * windowLengthInMs 被特意设置为 1000 毫秒,即每个桶代表 1 秒
     * 共 60 个桶,这样可以获得每秒精确的统计信息
     */
    private transient Metric rollingCounterInMinute =
        new ArrayMetric(60, 60 * 1000, false);

    // 省略其他字段和方法...
}
ArrayMetric 核心实现
ArrayMetric 是 Sentinel 中数据采集的核心,内部使用了 BucketLeapArray,即滑动窗口的思想进行数据的采集。
public class ArrayMetric implements Metric {

    /**
     * 滑动窗口数组
     */
    private final LeapArray<MetricBucket> data;

    public ArrayMetric(int sampleCount, int intervalInMs) {
        this.data = new OccupiableBucketLeapArray(sampleCount, intervalInMs);
    }

    public ArrayMetric(int sampleCount, int intervalInMs, boolean enableOccupy) {
        if (enableOccupy) {
            // 可抢占的滑动窗口,支持借用未来窗口的配额
            this.data = new OccupiableBucketLeapArray(sampleCount, intervalInMs);
        } else {
            // 普通滑动窗口
            this.data = new BucketLeapArray(sampleCount, intervalInMs);
        }
    }
}
这里有两种实现:
BucketLeapArray:普通滑动窗口,每个时间桶仅记录固定时间窗口内的指标数据;OccupiableBucketLeapArray:扩展实现,支持"抢占"未来时间窗口的令牌或容量,在流量突发时允许借用后续窗口的配额,实现更平滑的限流效果。
BucketLeapArray - 滑动窗口实现
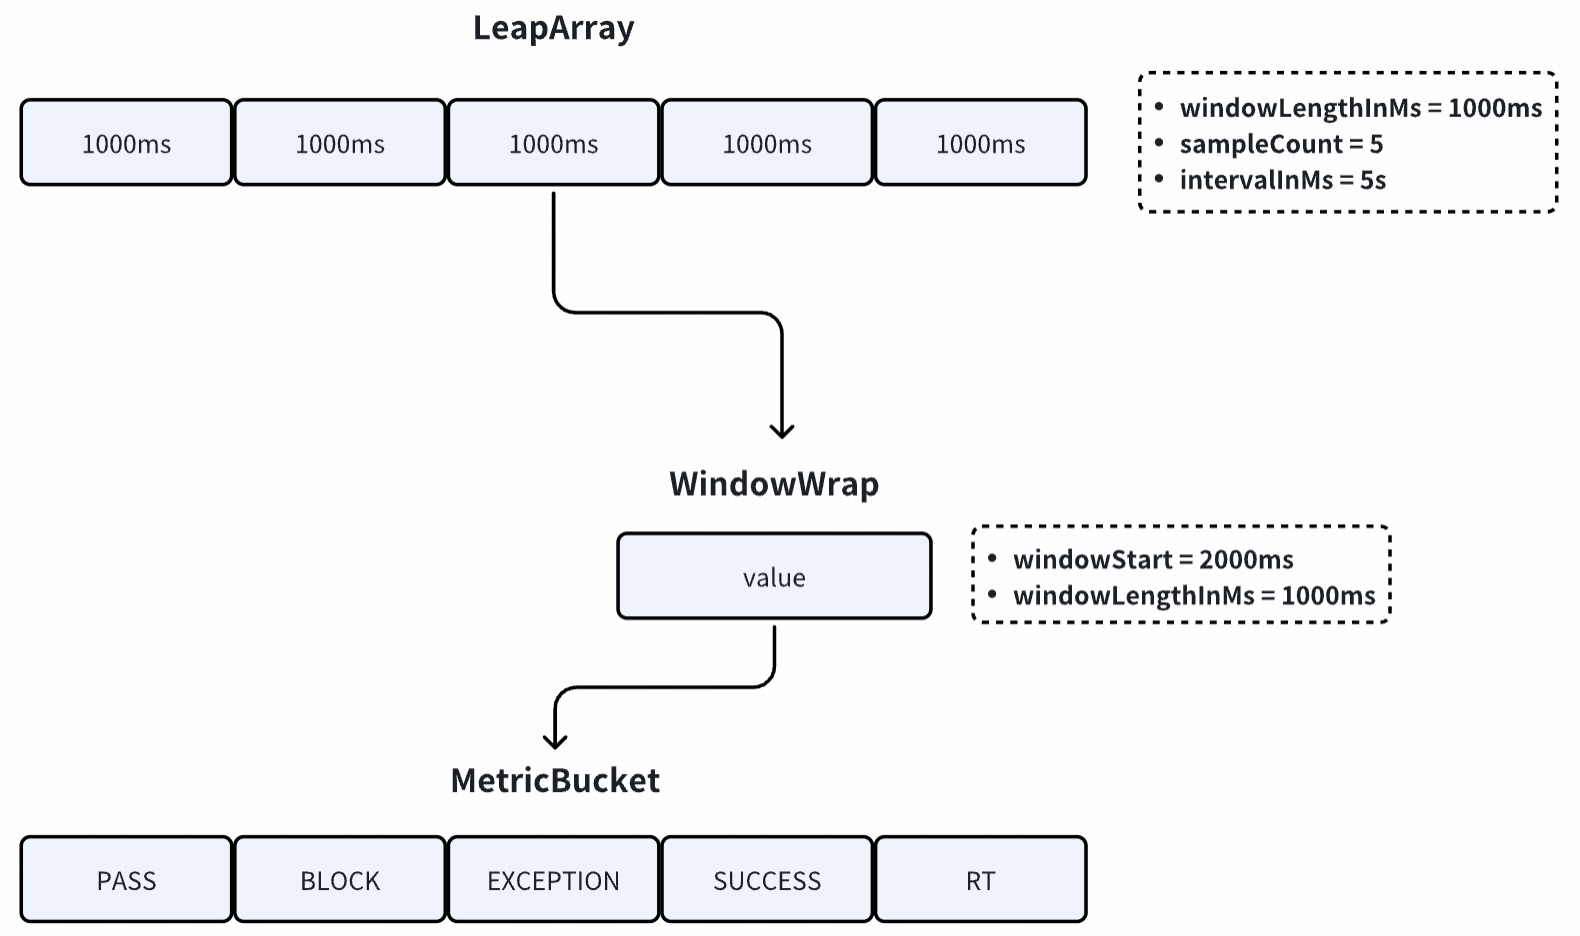
LeapArray 核心属性
Sentinel 中滑动窗口算法的核心类,先了解一下他的核心成员变量
public abstract class LeapArray<T> {
 //毫秒时间周期,默认60*1000,例如计算QPS时,为1000
    protected int intervalInMs;
 //窗口数量,默认60
    protected int sampleCount;
//窗口时间长度,毫秒数,默认1000ms 该值 = intervalInMs / sampleCount
    protected int windowLengthInMs;

 // 存储时间窗口的数组
    protected final AtomicReferenceArray<WindowWrap<T>> array;

    public LeapArray(int sampleCount, int intervalInMs) {
        AssertUtil.isTrue(sampleCount > 0, "bucket count is invalid: " + sampleCount);
        AssertUtil.isTrue(intervalInMs > 0, "total time interval of the sliding window should be positive");
        AssertUtil.isTrue(intervalInMs % sampleCount == 0, "time span needs to be evenly divided");

        this.windowLengthInMs = intervalInMs / sampleCount;
        this.intervalInMs = intervalInMs;
        this.sampleCount = sampleCount;

        this.array = new AtomicReferenceArray<>(sampleCount);
    }

}
WindowWrap 窗口包装器
每个窗口包装器包含三个属性:
 public class WindowWrap<T> {

    /**
     * 窗口大小(长度),单位:毫秒
     * 与 LeapArray 中的 windowLengthInMs 一致
     */
    private final long windowLengthInMs;

    /**
     * 窗口开始时间戳
     * 它的值是 windowLengthInMs 的整数倍
     */
    private long windowStart;

    /**
     * 窗口数据(泛型 T)
     * Sentinel 目前只有 MetricBucket 类型,存储统计数据
     */
    private T value;
}
MetricBucket 指标桶
public class MetricBucket {

    /**
     * 计数器数组
     * 长度是需要统计的事件种类数,目前是 6 个
     * LongAdder 是线程安全的计数器,性能优于 AtomicLong
     */
    private final LongAdder[] counters;

    // 省略其他字段和方法...
}
滑动窗口工作原理
LeapArray 统计数据的基本思路:
- 创建一个长度为 n 的数组,数组元素就是窗口;
- 每个窗口包装了 1 个指标桶,桶中存放了该窗口时间范围内对应的请求统计数据;
- 可以想象成一个环形数组在时间轴上向右滚动;
- 请求到达时,会命中数组中的一个窗口,该请求的数据就会存到命中的这个窗口包含的指标桶中;
- 当数组转满一圈时,会回到数组的开头;
- 此时下标为 0 的元素需要重复使用,它里面的窗口数据过期了,需要重置,然后再使用。
获取当前窗口
LeapArray 获取当前时间窗口的方法:
calculateTimeIdx
利用一个数组实现时间轴,每个元素代表一个时间窗口
Sentinel 中 数组长度是固定的,通过方法 calculateTimeIdx 来 确定时间戳在数组 中的位置 (找到时间戳对应的窗口位置)
private int calculateTimeIdx(long timeMillis) {
    long timeId = timeMillis / (long)this.windowLengthInMs;
    return (int)(timeId % (long)this.array.length());
}
怎么理解这个方法呢?
把数据带入进去,假设 windowLengthInMs = 500 ms (每个时间窗口大小是 500 ms)
如果 timestamp 从 0 开始的话,每个时间窗口为 [0,500) [500,1000) [1000,1500) ...
这时候先不考虑 timeId % array.length() ,也不考虑数组长度。假设当前 timeMillis = 601,将数值代入到 timeMillis / windowLengthInMs 其实就可以确定出当前的 timestamp 对应的时间窗口在数组中的位置了
由于数组长度是固定的,所以再加上求余数取模来确定时间窗在数组中的位置
currentWindow
先看下Window 的结构,计数器使用了泛型,可以更灵活
public class WindowWrap<T> {

    /**
     * Time length of a single window bucket in milliseconds.
     */
    private final long windowLengthInMs;

    /**
     * Start timestamp of the window in milliseconds.
     */
    private long windowStart;

    /**
     * Statistic data.
     */
    private T value;

 // 省略。。。
}
currentWindow方法根据传入的 timestamp 找到 或者 创建 这个时间戳对应的 Window
public WindowWrap<T> currentWindow(long timeMillis) {
    //当前时间如果小于0,返回空
    if (timeMillis < 0) {
        return null;
    }
    //计算时间窗口的索引
    int idx = calculateTimeIdx(timeMillis);
    // 计算当前时间窗口的开始时间
    long windowStart = calculateWindowStart(timeMillis);
     while (true) {
        //在窗口数组中获得窗口
        WindowWrap<T> old = array.get(idx);
        if (old == null) {
            /*
             *     B0       B1      B2    NULL      B4
             * ||_______|_______|_______|_______|_______||___
             * 200     400     600     800     1000    1200  timestamp
             *                             ^
             *                          time=888
             * 比如当前时间是888,根据计算得到的数组窗口位置是个空,所以直接创建一个新窗口就好了
             */
            WindowWrap<T> window = new WindowWrap<T>(
                windowLengthInMs, windowStart, newEmptyBucket(timeMillis));
            if (array.compareAndSet(idx, null, window)) {
                // Successfully updated, return the created bucket.
                return window;
            } else {
                // Contention failed, the thread will yield its time slice to
                // wait for bucket available.
                Thread.yield();
            }
        } else if (windowStart == old.windowStart()) {
            /*
             *     B0       B1      B2     B3      B4
             * ||_______|_______|_______|_______|_______||___
             * 200     400     600     800     1000    1200  timestamp
             *                             ^
             *                          time=888
             * 这个更好了,刚好等于,直接返回就行
             */
            return old;
        } else if (windowStart > old.windowStart()) {
            /*
             *     B0       B1      B2     B3      B4
             * |_______|_______|_______|_______|_______||___
             * 200     400     600     800     1000    1200  timestamp
             *             B0       B1      B2    NULL      B4
             * |_______||_______|_______|_______|_______|_______||___
             * ...    1200     1400    1600    1800    2000    2200  timestamp
             *                              ^
             *                           time=1676
             * 这个要当成圆形理解就好了,之前如果是1200一个完整的圆形,然后继续从1200开始,如果现在时间是1676,落在在B2的位置,
             * 窗口开始时间是1600,获取到的old时间其实会是600,所以肯定是过期了,直接重置窗口就可以了
             */
            if (updateLock.tryLock()) {
                try {
                    // Successfully get the update lock, now we reset the
                    // bucket.
                    return resetWindowTo(old, windowStart);
                } finally {
                    updateLock.unlock();
                }
            } else {
                Thread.yield();
            }
        } else if (windowStart < old.windowStart()) {
            // 这个不太可能出现,嗯。。时钟回拨
            return new WindowWrap<T>(
                windowLengthInMs, windowStart, newEmptyBucket(timeMillis));
        }
    }
}
方法逻辑分析如下:
首先要做的两件事
- 计算 timestamp 在数组中的位置,就是上文说的 calculateTimeIdx
- 计算 timestamp 的 windowStart (窗口开始时间),通过 timeMillis - timeMillis % windowLengthInMs
然后进入一个 while(true) 循环, 通过 WindowWrap<T> old = array.get(idx) 找出对应的窗口,接下来就是三种情况了
- old == null:这个时候代表数组中还没有这个 window,创建这个 window 加入到数组中(由于此时可能会有多个线程同时添加数组元素,所以一定要保证线程安全,所以这里使用的数组为 AtomicReferenceArray),添加成功后返回新建的 window
- windowStart == old.windowStart():window 已经存在了,直接返回即可
- windowStart > old.windowStart():代表数组中的元素已经至少是 25s 之前的了,重置当前窗口的 windowStart 和 计数器,这个操作同样也是一个多线程操作,所以使用了 updateLock.tryLock()。
- windowStart < old.windowStart():通常情况下不会走到这个逻辑分支
values
上文中提到计算流量时具体使用几个窗口,取决于窗口大小和单位时间大小
该方法的作用通过传入一个时间戳,找出本次计算所需的所有时间窗口
public List<T> values(long timeMillis) {
    if (timeMillis < 0L) {
        return new ArrayList();
    } else {
        int size = this.array.length();
        List<T> result = new ArrayList(size);

        for(int i = 0; i < size; ++i) { //这里逻辑就是遍历数组将时间符合的窗口加入到 List 中
            WindowWrap<T> windowWrap = (WindowWrap)this.array.get(i);
            if (windowWrap != null && !this.isWindowDeprecated(timeMillis, windowWrap)) {
                result.add(windowWrap.value());
            }
        }

        return result;
    }
}

public boolean isWindowDeprecated(long time, WindowWrap<T> windowWrap) {
  // intervalInMs 在单机限流计算QPS时默认为 1000(ms)
        return time - windowWrap.windowStart() > intervalInMs;
 }
重点看一下 isWindowDeprecated 这个方法
还是像上面那样把数值带进去。每个窗口大小为 500 ms,例如 timestamp 为 1601,这个 timestamp 对应的 windowStart 为 1500,此时 (1601 - 1500 > 1000) = false 即这个窗口是有效的,再往前推算,上一个窗口 windowStart 为 1000 也是有效的。再往前推算,或者向后推算都是无效的窗口。
数据存储
在获取到窗口之后,就可以存储数据了。ArrayMetric 实现了 Metric 中存取数据的接口方法。
示例:存储 RT(响应时间)
/**
 * 添加响应时间数据
 *
 * @param rt 响应时间(毫秒)
 */
public void addRT(long rt) {
    // 获取当前时间窗口,data 为 BucketLeapArray
    WindowWrap<MetricBucket> wrap = data.currentWindow();

    // 计数
    wrap.value().addRT(rt);
}

/**
 * MetricBucket 的 addRT 方法
 *
 * @param rt 响应时间
 */
public void addRT(long rt) {
    // 记录 RT 时间对 rt 值
    add(MetricEvent.RT, rt);

    // 记录最小响应时间(非线程安全,但没关系)
    if (rt < minRt) {
        minRt = rt;
    }
}

/**
 * 通用的计数方法
 *
 * @param event 事件类型
 * @param n 增加的数量
 * @return 当前桶
 */
public MetricBucket add(MetricEvent event, long n) {
    counters[event.ordinal()].add(n);
    return this;
}
数据读取
示例:读取 RT(响应时间)
/**
 * 获取总响应时间
 *
 * @return 总响应时间
 */
public long rt() {
    // 触发当前窗口更新(处理过期窗口)
    data.currentWindow();

    long rt = 0;
    // 取出所有的 bucket
    List<MetricBucket> list = data.values();

    for (MetricBucket window : list) {
        rt += window.rt(); // 求和
    }
    return rt;
}

/**
 * 获取所有有效的窗口
 *
 * @return 有效窗口列表
 */
public List<T> values() {
    return values(TimeUtil.currentTimeMillis());
}

/**
 * 获取指定时间之前的所有有效窗口
 *
 * @param timeMillis 时间戳
 * @return 有效窗口列表
 */
public List<T> values(long timeMillis) {
    if (timeMillis < 0) {
        return new ArrayList<T>(); // 正常情况不会到这里
    }

    int size = array.length();
    List<T> result = new ArrayList<T>(size);

    for (int i = 0; i < size; i++) {
        WindowWrap<T> windowWrap = array.get(i);

        // 过滤掉没有初始化过的窗口和过期的窗口
        if (windowWrap == null || isWindowDeprecated(timeMillis, windowWrap)) {
            continue;
        }

        result.add(windowWrap.value());
    }
    return result;
}

/**
 * 判断窗口是否过期
 *
 * @param time 给定时间(通常是当前时间)
 * @param windowWrap 窗口包装器
 * @return 如果过期返回 true
 */
public boolean isWindowDeprecated(long time, WindowWrap<T> windowWrap) {
    // 给定时间与窗口开始时间超过了一个采集周期
    return time - windowWrap.windowStart() > intervalInMs;
}
Sentinel 限流思路
在理解了 LeapArray#currentWindow 和 LeapArray#values 方法的细节之后,其实我们就可以琢磨出限流的实现思路了
首先根据当前时间戳,找到对应的几个 window,根据 所有 window 中的流量总和 + 当前申请的流量数 决定能否通过
如果不能通过,抛出异常
如果能通过,则对应的窗口加上本次通过的流量数
OccupiableBucketLeapArray - 可抢占窗口
为什么需要 OccupiableBucketLeapArray?
假设一个资源的访问 QPS 稳定是 10,请求是均匀分布的:
在时间 0.0-1.0 秒区间中,通过了 10 个请求;
在 1.1 秒的时候,观察到的 QPS 可能只有 5,因为此时第一个时间窗口被重置了,只有第二个时间窗口有值;
当在秒级统计的情形下,用 BucketLeapArray 会有 0~50%的数据误这时就要用 OccupiableBucketLeapArray 来解决这个问题。
OccupiableBucketLeapArray 实现
从上面我们可以看到在秒级统计 rollingCounterInSecond 中,初始化实例时有两种构造参数:
public class OccupiableBucketLeapArray extends LeapArray<MetricBucket> {

    /**
     * 借用未来窗口的数组
     */
    private final FutureBucketLeapArray borrowArray;

    public OccupiableBucketLeapArray(int sampleCount, int intervalInMs) {
        super(sampleCount, intervalInMs);
        // 创建借用窗口数组
        this.borrowArray = new FutureBucketLeapArray(sampleCount, intervalInMs);
    }

    /**
     * 创建新的空桶
     * 会从 borrowArray 中借用数据
     */
    @Override
    public MetricBucket newEmptyBucket(long time) {
        MetricBucket newBucket = new MetricBucket();

        // 获取借用窗口的数据
        MetricBucket borrowBucket = borrowArray.getWindowValue(time);
        if (borrowBucket != null) {
            // 将借用数据复制到新桶中
            newBucket.reset(borrowBucket);
        }

        return newBucket;
    }

    /**
     * 重置窗口
     * 会从 borrowArray 中借用 pass 数据
     */
    @Override
    protected WindowWrap<MetricBucket> resetWindowTo(WindowWrap<MetricBucket> w, long time) {
        // 更新开始时间并重置值
        w.resetTo(time);

        MetricBucket borrowBucket = borrowArray.getWindowValue(time);
        if (borrowBucket != null) {
            // 重置桶值并添加借用的 pass 数据
            w.value().reset();
            w.value().addPass((int) borrowBucket.pass());
        } else {
            w.value().reset();
        }

        return w;
    }

    /**
     * 获取当前等待中的请求数量
     */
    @Override
    public long currentWaiting() {
        borrowArray.currentWindow();
        long currentWaiting = 0;
        List<MetricBucket> list = borrowArray.values();

        for (MetricBucket window : list) {
            currentWaiting += window.pass();
        }
        return currentWaiting;
    }

    /**
     * 添加等待中的请求数量
     *
     * @param time 时间
     * @param acquireCount 获取数量
     */
    @Override
    public void addWaiting(long time, int acquireCount) {
        WindowWrap<MetricBucket> window = borrowArray.currentWindow(time);
        window.value().add(MetricEvent.PASS, acquireCount);
    }
}
漏斗算法的实现
Sentinel 主要根据 FlowSlot 中的流控进行流量控制,其中 RateLimiterController 就是漏斗算法的实现
整体逻辑如下:
- 首先计算出当前请求平摊到 1 秒内的时间花费,然后去计算这一次请求预计时间;
- 如果小于当前时间的话,那么以当前时间为主,返回即可;
- 反之如果超过当前时间的话,这时候就要进行排队等待了。等待的时候要判断是否超过当前最大的等待时间,超过就直接丢弃;
- 没有超过就更新上一次的通过时间,然后再比较一次是否超时。如果还超时就重置时间,反之在等待时间范围之内的话就等待。如果都不是,那就可以通过了。
public class RateLimiterController implements TrafficShapingController {
    //最大等待超时时间,默认500ms
    private final int maxQueueingTimeMs;
    //限流数量
    private final double count;
    //上一次的通过时间
    private final AtomicLong latestPassedTime = new AtomicLong(-1);
     @Override public boolean canPass(
        Node node, int acquireCount, boolean prioritized) {
        // Pass when acquire count is less or equal than 0.
        if (acquireCount <= 0) {
            return true;
        }
        // Reject when count is less or equal than 0.
        // Otherwise,the costTime will be max of long and waitTime will overflow
        // in some cases.
        if (count <= 0) {
            return false;
        }
         long currentTime = TimeUtil.currentTimeMillis();
        //时间平摊到1s内的花费
        long costTime = Math.round(
            1.0 * (acquireCount) / count * 1000); // 1 / 100 * 1000 = 10ms

            //计算这一次请求预计的时间
            long expectedTime = costTime + latestPassedTime.get();

            //花费时间小于当前时间,pass,最后通过时间 = 当前时间
            if (expectedTime <= currentTime) {
            latestPassedTime.set(currentTime);
            return true;
        }
        else {
            //预计通过的时间超过当前时间,要进行排队等待,重新获取一下,避免出现问题,差额就是需要等待的时间
            long waitTime = costTime + latestPassedTime.get()
                - TimeUtil.currentTimeMillis();
            //等待时间超过最大等待时间,丢弃
            if (waitTime > maxQueueingTimeMs) {
                return false;
            } else {
                //反之,可以更新最后一次通过时间了
                long oldTime = latestPassedTime.addAndGet(costTime);
                try {
                    waitTime = oldTime - TimeUtil.currentTimeMillis();
                    //更新后再判断,还是超过最大超时时间,那么就丢弃,时间重置
                    if (waitTime > maxQueueingTimeMs) {
                        latestPassedTime.addAndGet(-costTime);
                        return false;
                    }
                    //在时间范围之内的话,就等待
                    if (waitTime > 0) {
                        Thread.sleep(waitTime);
                    }
                    return true;
                } catch (InterruptedException e) {
                }
            }
        }
        return false;
    }
}
令牌桶算法的实现
Sentinel 的令牌桶实现基于 Guava,代码在 WarmUpController 中。
拿到当前窗口和上一个窗口的 QPS;填充令牌,也就是往桶里丢令牌。
public class WarmUpController implements TrafficShapingController {
    //限流QPS
    protected double count;
    //冷启动系数,默认=3
    private int coldFactor;
    //警戒的令牌数
    protected int warningToken = 0;
    //最大令牌数
    private int maxToken;
    //斜率,产生令牌的速度
    protected double slope;
    //存储的令牌数量
    protected AtomicLong storedTokens = new AtomicLong(0);
    //最后一次填充令牌时间
    protected AtomicLong lastFilledTime = new AtomicLong(0);

    public WarmUpController(
        double count, int warmUpPeriodInSec, int coldFactor) {
        construct(count, warmUpPeriodInSec, coldFactor);
    }
     public WarmUpController(double count, int warmUpPeriodInSec) {
        construct(count, warmUpPeriodInSec, 3);
    }
     private void construct(
        double count, int warmUpPeriodInSec, int coldFactor) {
        if (coldFactor <= 1) {
            throw new IllegalArgumentException(
                "Cold factor should be larger than 1");
        }
        this.count = count;
        this.coldFactor = coldFactor;

            // stableInterval 稳定产生令牌的时间周期,1/QPS
            // warmUpPeriodInSec 预热/冷启动时间 ,默认 10s
            warningToken = (int) (warmUpPeriodInSec * count) / (coldFactor - 1);
        maxToken = warningToken
            + (int) (2 * warmUpPeriodInSec * count / (1.0 + coldFactor));
        //斜率的计算参考Guava,当做一个固定改的公式
        slope = (coldFactor - 1.0) / count / (maxToken - warningToken);
    }

    @Override public boolean canPass(
        Node node, int acquireCount, boolean prioritized) {
        //当前时间窗口通过的QPS
        long passQps = (long) node.passQps();
        //上一个时间窗口QPS
        long previousQps = (long) node.previousPassQps();
        //填充令牌
        syncToken(previousQps);

            // 开始计算它的斜率
            // 如果进入了警戒线,开始调整他的qps
            long restToken = storedTokens.get();
        if (restToken >= warningToken) {
            //当前的令牌超过警戒线,获得超过警戒线的令牌数
            long aboveToken = restToken - warningToken;
            // 消耗的速度要比warning快,但是要比慢
            // current interval = restToken*slope+1/count
            double warningQps =
                Math.nextUp(1.0 / (aboveToken * slope + 1.0 / count));
            if (passQps + acquireCount <= warningQps) {
                return true;
            }
        } else {
            if (passQps + acquireCount <= count) {
                return true;
            }
        }
        return false;
    }
}
填充令牌的逻辑如下:
- 拿到当前的时间,然后去掉毫秒数得到的就是秒级时间;
- 判断时间小于这里就是为了控制每秒丢一次令牌;
- 然后就是 coolDownTokens 去计算我们的冷启动 / 预热是怎么计算填充令牌的;
- 后面计算当前剩下的令牌数,这个就不说了。减去上一次消耗的就是桶里剩下的令牌。
protected void syncToken(long passQps) {
    long currentTime = TimeUtil.currentTimeMillis();
    //去掉当前时间的毫秒
    currentTime = currentTime - currentTime % 1000;
    long oldLastFillTime = lastFilledTime.get();
    //控制每秒填充一次令牌
    if (currentTime <= oldLastFillTime) {
        return;
    }
    //当前的令牌数量
    long oldValue = storedTokens.get();
    //获取新的令牌数量,包含添加令牌的逻辑,这就是预热的逻辑
    long newValue = coolDownTokens(currentTime, passQps);
    if (storedTokens.compareAndSet(oldValue, newValue)) {
        //存储的令牌数量当然要减去上一次消耗的令牌
        long currentValue = storedTokens.addAndGet(0 - passQps);
        if (currentValue < 0) {
            storedTokens.set(0L);
        }
        lastFilledTime.set(currentTime);
    }
}- 最开始的时候因为 lastFilledTime 和 oldValue 都是 0,所以根据当前时间戳会得到一个非常大的数字。最后,和 maxToken 取小的话就得到了最大的令牌数。所以第一次初始化的时候就会生成 maxToken 的令牌;
- 之后我们假设系统的 QPS 一开始很低,然后突然飙高。所以,开始的时候回一直走到高于警戒线的逻辑里去,然后 passQps 又很低。所以,会一直处于把令牌桶填满的状态(currentTime - lastFilledTime.get() 会一直都是 1000,也就是 1 秒),所以每次都会填充最大 QPScount 数量的令牌;
- 然后突增流量来了,QPS 瞬间很高。慢慢地令牌数量就会消耗到警戒线之下,走到我们 if 的逻辑里去,然后去按照 count 数量增加令牌。
private long coolDownTokens(long currentTime, long passQps) {
    long oldValue = storedTokens.get();
    long newValue = oldValue;

    //水位低于警戒线,就生成令牌
    if (oldValue < warningToken) {
        //如果桶中令牌低于警戒线,根据上一次的时间差,得到新的令牌数,因为去掉了毫秒,1秒生成的令牌就是阈值count
        //第一次都是0的话,会生成count数量的令牌
        newValue = (long) (oldValue
            + (currentTime - lastFilledTime.get()) * count / 1000);
    }
    else if (oldValue > warningToken) {
        //反之,如果是高于警戒线,要判断QPS。因为QPS越高,生成令牌就要越慢,QPS低的话生成令牌要越快
        if (passQps < (int) count / coldFactor) {
            newValue = (long) (oldValue
                + (currentTime - lastFilledTime.get()) * count / 1000);
        }
    }
    //不要超过最大令牌数
    return Math.min(newValue, maxToken);
}
上面的逻辑理顺之后,我们就可以继续看限流的部分逻辑:
- 令牌计算的逻辑完成,然后判断是不是超过警戒线。按照上面的说法,低 QPS 的状态肯定是一直超过的,所以会根据斜率来计算出一个 warningQps。因为我们处于冷启动的状态,所以这个阶段就是要根据斜率来计算出一个 QPS 数量,让流量慢慢地达到系统能承受的峰值。举个例子,如果 count 是 100,那么在 QPS 很低的情况下,令牌桶一直处于满状态。但是系统会控制 QPS,实际通过的 QPS 就是 warningQps,根据算法可能只有 10 或者 20(怎么算的不影响理解)。QPS 主键提高的时候,aboveToken 再逐渐变小,整个 warningQps 就在逐渐变大。直到走到警戒线之下,到了 else 逻辑里;
- 流量突增的情况,就是 else 逻辑里低于警戒线的情况,我们令牌桶在不停地根据 count 去增加令牌。此时消耗令牌的速度超过我们生成令牌的速度,可能就会导致一直处于警戒线之下。这时候判断当然就需要根据最高 QPS 去判断限流了。
long restToken = storedTokens.get();
if (restToken >= warningToken) {
    //当前的令牌超过警戒线,获得超过警戒线的令牌数
    long aboveToken = restToken - warningToken;
    // 消耗的速度要比warning快,但是要比慢
    // current interval = restToken*slope+1/count
    double warningQps = Math.nextUp(1.0 / (aboveToken * slope + 1.0 / count));
    if (passQps + acquireCount <= warningQps) {
        return true;
    }
} else {
    if (passQps + acquireCount <= count) {
        return true;
    }
}
所以,按照低 QPS 到突增高 QPS 的流程,来想象一下这个过程:
- 刚开始,系统的 QPS 非常低,初始化我们就直接把令牌桶塞满了;
- 然后这个低 QPS 的状态持续了一段时间,因为我们一直会填充最大 QPS 数量的令牌(因为取最小值,所以其实桶里令牌基本不会有变化),所以令牌桶一直处于满的状态,整个系统的限流也处于一个比较低的水平。这以上的部分一直处于警戒线之上。实际上就是叫做冷启动 / 预热的过程;
- 接着系统的 QPS 突然激增,令牌消耗速度太快。就算我们每次增加最大 QPS 数量的令牌任然无法维持消耗,所以桶里的令牌在不断低减少。这个时候,冷启动阶段的限制 QPS 也在不断地提高,最后直到桶里的令牌低于警戒线;
- 低于警戒线之后,系统就会按照最高 QPS 去限流,这个过程就是系统在逐渐达到最高限流的过程。那这样一来,实际就达到了我们处理突增流量的目的,整个系统在漫漫地适应突然飙高的 QPS,然后最终达到系统的 QPS 阈值;
- 最后,如果 QPS 回复正常,那么又会逐渐回到警戒线之上,就回到了最开始的过程。